
- Inset Cabinets Guide and Ideas - December 10, 2022
- Valspar Cabinet Paint Review and Guide - November 16, 2022
As someone who sells cabinetry as part of their profession, I get a lot of people asking me what the options are if they just want their cabinets painted. This is a very niche service for businesses because many companies won’t want to paint a client’s existing cabinetry for warranty purposes. The only place left to turn is a private contractor or our very own DIY skills!
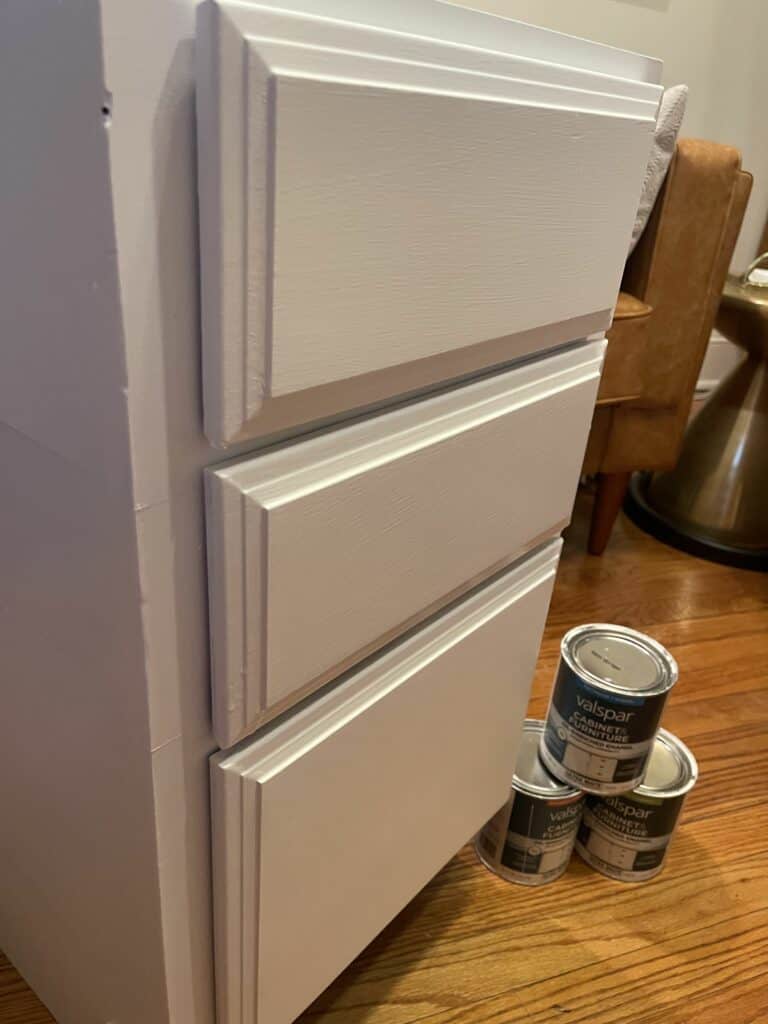
Doing it yourself always feels like a huge undertaking (at least it does for me!). Niche products like this Valspar Cabinet Paint can often make the journey easier. I’ve never painted cabinetry or furniture before so I am just as curious about this product as you are!
As a professional, I am always weary of the outcome of a product and project like this. You don’t want such a major aspect of your home, like your kitchen cabinets, bedroom dresser, or office bookcase, to appear sloppy or half-done. I expect to have a clean and neat finish with good color coverage once the project is done. So let’s see how this goes!
First, the Bottom Line
If you are handy or crafty this is the project for you. This project will take some time, so patience is key. You also do not want to rush through the actual painting. If you want a quality-looking finished product you will need to take your time with both the prepping and painting.
Ultimately, if you have the time this project is worth undertaking. It’s a great way to save money on a remodel or if you just desperately need a change but are on a budget, and this paint is a great option to use.
3 Things To Look For In A Quality Cabinet Paint
The Overall Feel of the Paint when it is Completely Dry
Before you start your project I would recommend performing a test on a scrap piece of wood or perhaps the inside/back of whatever you are painting. You want to make sure you are okay with how the paint feels once it is dry.
You especially want to test the feel of the paint if you are using this paint on cabinets you will be feeling/touching quite often, so make sure you can live with how it feels. Some of the paint options have a chalky feel, and if you’re anything like me that makes my skin crawl.
Color Coverage
Another good reason to test a sample before you start painting is to see what the coverage is like. This will also give you a good idea of how many coats of paint you will need, and how much time you will have to budget.
For me, I was painting over a dark wood stain cabinet and it needed SO many coats. The final count was 5 coats, but it probably could have used a 6th. I was not expecting this. A good quality paint should maybe need 3 coats MAX. So if you are using this particular paint on a dark cabinet you might want to consider other options, or maybe a primer first.
Cleanability
If you are going through all of the trouble of painting your cabinets you want to make sure the paint will hold up & be functional. On the test piece see how easy it is to wipe off food and dirt. Also, take a peek to see if any paint is coming off on your rag if you use a cleaner. It’s always recommended to use a nonabrasive cleaner, but sometimes big messes happen.
When I performed this test it cleaned very easily. However, I could tell if I scrubbed hard at the corners the paint would chip off. To keep this paint in perfect condition you might have to baby it, and for some people’s lifestyles that is just not going to work.
Choosing Your Sheen
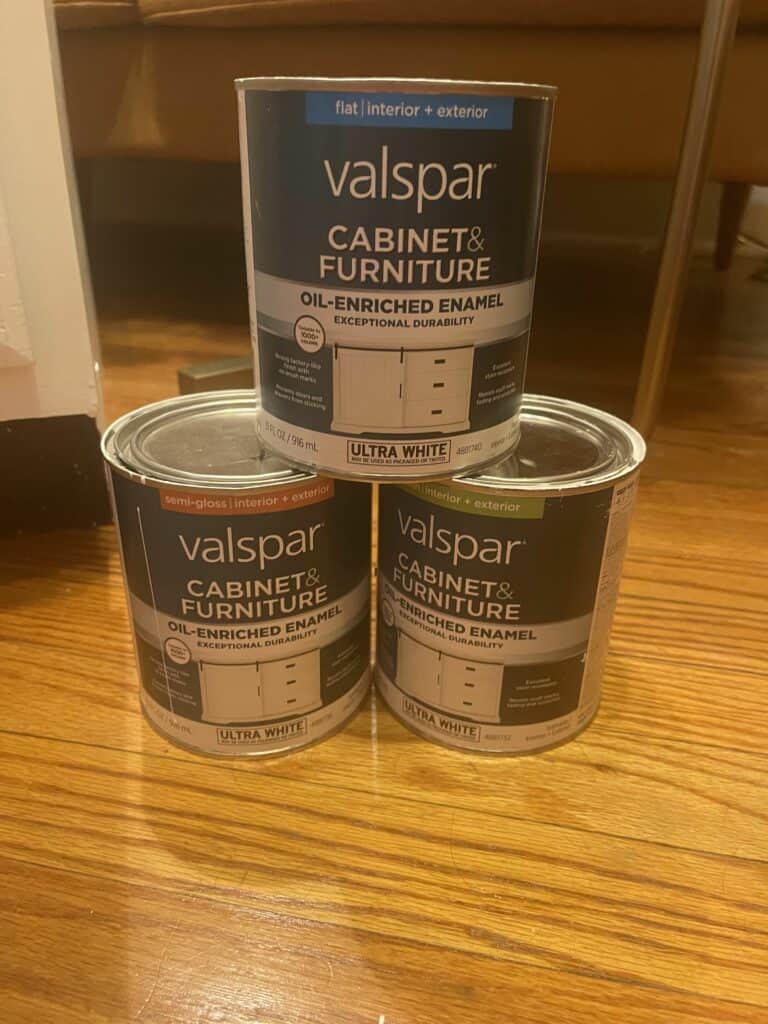
Valspar cabinet paint offers 3 different sheen options:
- Flat
- Satin
- Semi-Gloss
Depending on what you’re painting and how you want the finished product you should take this into account when choosing your paint sheen.
Flat
The paint itself is very thick to apply. Keep this in mind when you are mixing the paint as it will take a little longer to properly mix. You can see the most brush strokes in the flat paint by far.
The feel of the paint once it’s dry feels chalky under your fingernails. It does not have the polished elegant feel you’d want from painted cabinets or furniture. The only time I can see you’d want to use the flat paint is if the surface you are wanting to paint is in rough shape with lots of scratches or pits. The flat paint will hide those imperfections better than the other sheens.
Satin
The satin paint was drastically thinner than the flat paint. It was a lot easier to brush on, but on the slip side, I felt like it needed more coats of paint. The feel of the paint once dry is still chalky. Not nearly as chalky as the flat paint, but still rough to the touch and not that smooth finish cabinets or furniture often have. I liked the appearance of the satin much more than the flat.
Semi-Gloss
The semi-gloss finish has a nice shine to it. This was my personal favorite paint of the three options Valspar offers. This has that factory finish you want to see on your painted cabinets or furniture.
This paint was also the thinnest, so it ran easily. You are going to have to be extra careful while applying the semi-gloss paint. If you choose to use this paint you will also have to do more prep work on the surface area you are painting. Any scratches, dents, or chips will be noticeable through the paint.
Other Options to Consider
The two main competitors to this product on the market are Rust-Oleum Cabinet Transformations and Nuvo Cabinet Paint.
Rust-Oleum Cabinet Transformations
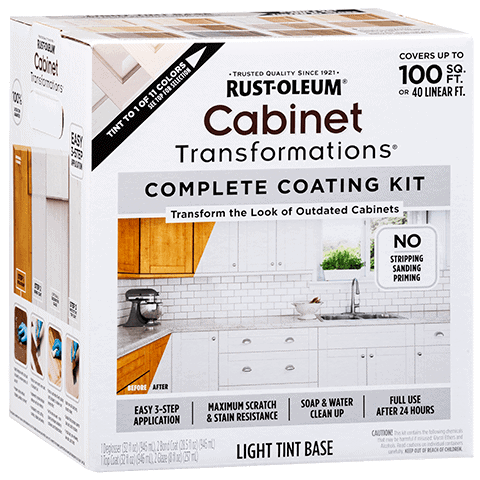
This product appears to be very similar to the Valspar paint. You can also find it at Lowes, or other hardware stores. Rust-Oleum is a very reputable paint brand with various products on the market. The pricing is also a smidge cheaper than Valspar.
Nuvo Cabinet Paint
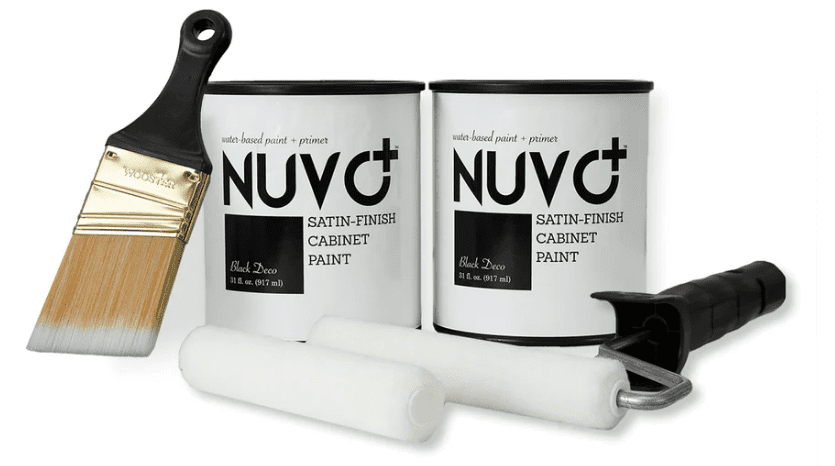
This company only makes one product, and it’s cabinet paint. They have the widest selection of colors. You can purchase this product online on Amazon and other online retailers. Their pricing is slightly higher, but still in the same basic range as the Valspar or Rust-Oleum.
From Start to Finish
For starters, the product is super easy to get! I got the paint at Lowes. They had plenty of stock with all the different sheen options and a good selection of colors to choose from off the shelf. There are a lot more options online, but it’s nice to see products on the shelf in case you are in a pinch.
Tools You Will Need
Painting is a messy business! You will need drop cloths FOR SURE. Your brush choice is pretty important as well. Spend the extra $10-$20 on a good-quality brush for a project like this. I do not recommend using an old brush you have lying around from another project you’ve been working on. A small roller brush will also work.
Make sure you have sandpaper (not too harsh of a grit), a cloth, and a non-abrasive cleaner. If you have a scraper on hand, great! If not, you don’t need to go out of your way to get one, however, they do sell them at the dollar store, and it’s a handy little tool to have. Lastly, depending on what you’re painting you might need painter’s tape.
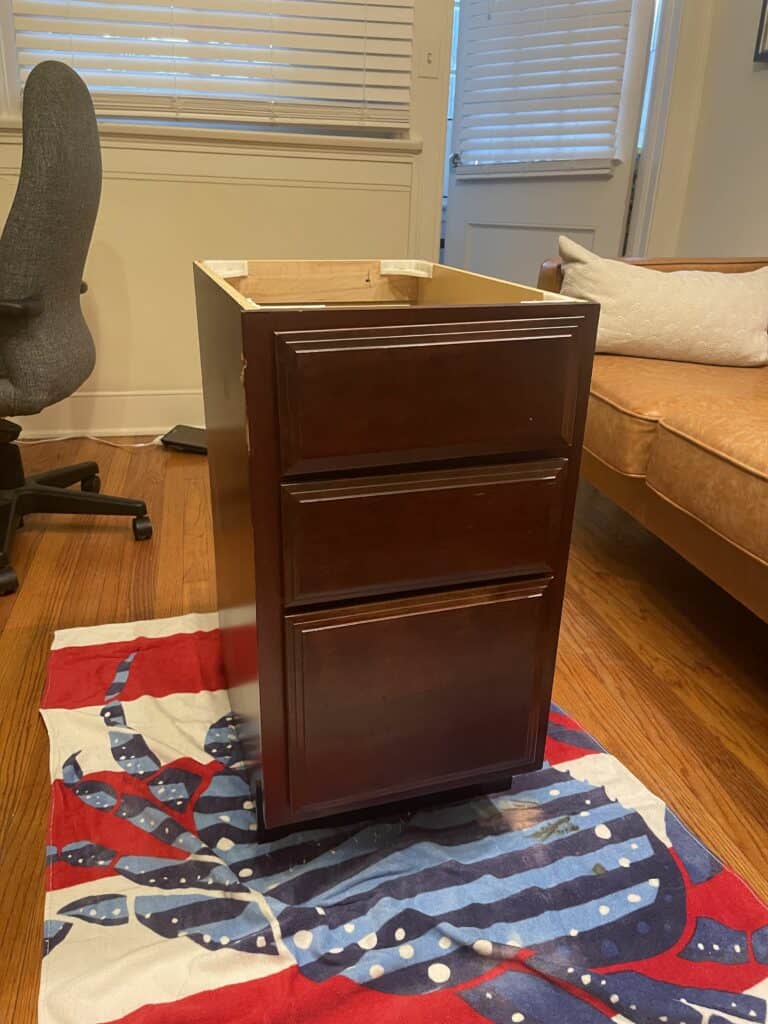
Prepping Your Cabinet
You will need to remove all drawers, doors, & cabinet hardware/hinges from your cabinets. If you are painting a piece of assembled furniture you will want to take it apart before painting.
Whatever you are painting (cabinetry or furniture) wipe it down with a clean cloth and your non-abrasive cleaner. You want to make sure no dust, dirt, or particles of any kind are on the surface you will be painting.
Now depending on the condition of what you are painting you might need to sand the rough edges of some corners or buff out any scratches you might have in the wood. Same thing with the scraping. If there is a build-up or chipping paint you will need to scrape that off to get as smooth and clean of a surface as possible before you start painting.
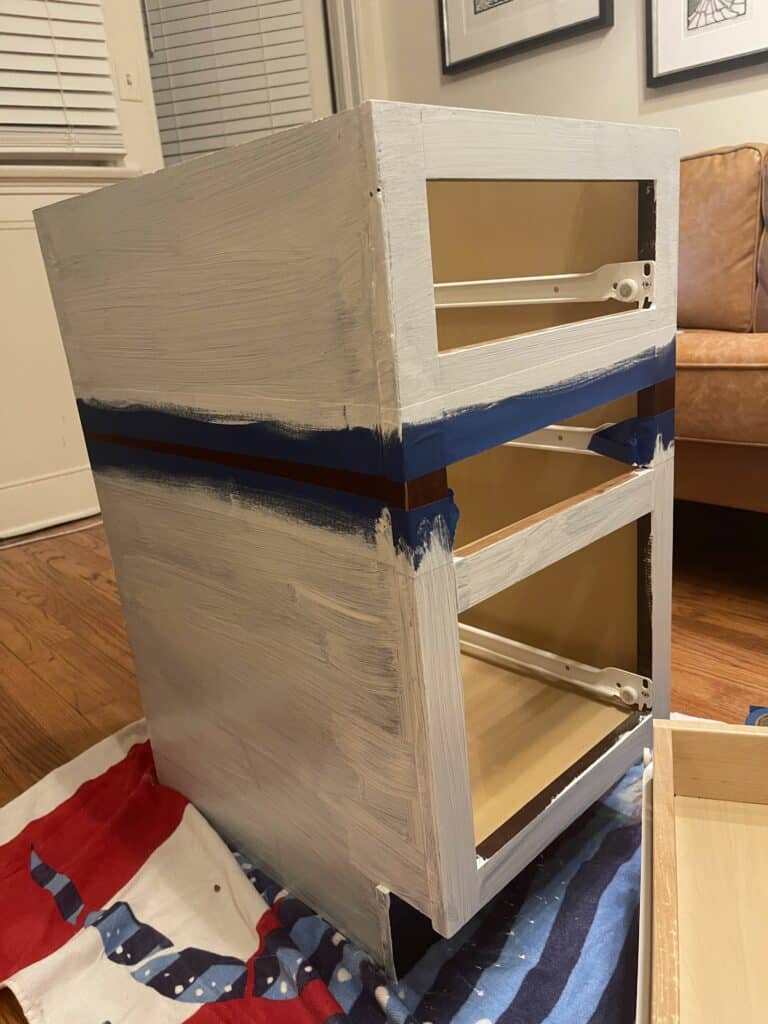
The Actual Painting
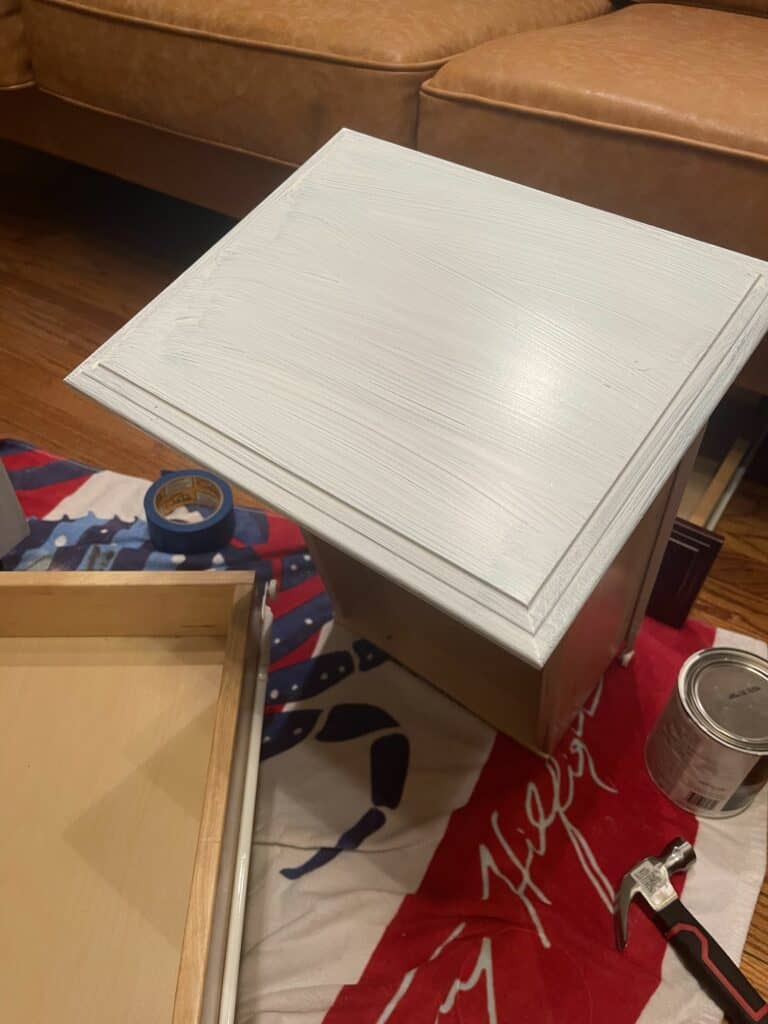
This. Takes. Time. I painted on a dark stained wooden cabinet and it ended up needing 5 coats to get a complete color coverage. The instructions recommend waiting 4 hours in between each coat application, and I followed those instructions to the letter. If we do some quick math that’s 16 hours of just waiting for the paint to dry! Plus the actual paint time itself.
Once you’re on coat 3 or 4 you are tempted to rush through, but you still need to take your time. Don’t apply giant globs of paint in a hurry. Take your time to properly apply the paint to the brush, use long and even strokes while painting, and try to brush in the same direction if possible.
Pros and Cons
Pros
- Budget conscious
- Minimal mess
- Not a lot of supplies needed
Cons
- Time-consuming
- Very visible brush strokes (if not applied properly)
- Dry times
FAQs
Answer: Yes. However, you have to also figure out what your time is worth. The paint and materials needed (depending on the size of your project) will maybe cost you $250. The time you have invested is more difficult to calculate in dollar amounts. If budget is your number 1 priority and you don’t mind the time then this is definitely the project for you.
Answer: From my experience, no. Once done, it has a very nice and professional finish, but I could see the brush strokes. The more coats I did the less visible they were, but still not invisible. Using a roller might be a better option, but a roller is going to be a lot harder getting those curved and beveled surfaces.
Answer: If you take care of it, yes. However, because you are painting it yourself it is no comparison to a factory baked-on paint. DIY-painted cabinetry or furniture is more prone to chip or rub off.
This particular paint didn’t recommend a primer or top coat, but if you wanted extra protection it’s not a bad idea to do it anyway. If you have kids or pets just know damages could happen, but the nice thing is you have the paint so you can always touch up any chips or nicks down the road.
Valspar Cabinet Paint Review: My Final Thoughts
It was a fun project! I was pretty happy with the quality of the paint. I was surprised at how visible the paint strokes were. A roller I think would be best if you want a smoother finish. Overall it gives a fresh look to what I was painting. Just remember, budget lots of time!